- All of Microsoft
How to do Mail Merge in Power Automate (Full Tutorial)
Master advanced mail merge in Microsoft Power Automate with our comprehensive video tutorial. Unleash the full potential of Excel and Word for automation magic!
Understanding Mail Merge Automation
Mastering mail merge automation can significantly increase productivity in any office environment. Anders Jensen [MVP] provides a detailed tutorial that teaches you advanced techniques using Microsoft Power Automate. The process he outlines includes configuring Word templates with dynamic placeholders, extracting data from an Excel source, and setting up Power Automate to execute the task automatically.
Automate. Learn how to use a Word template with placeholders, Excel as a data
source, and Power Automate to do the mail merge automatically. You also learn
how to send up an advanced trigger so the flow runs each time a new file is
added to a folder.
- 00:00 Prepare Excel data
- 01:43 Word Template
- 05:34 Power Automate Mail Merge
- 15:58 Trigger and Advanced Expressions
By setting up an advanced trigger, users can have the task activate whenever a new file is added to a specified folder. This optimization allows for a seamless flow of document generation without constant user intervention.
The instructional video is broken into clear sections that designate specific steps: preparing your Excel data, crafting a Word template, and establishing the Power Automate mail merge flow. For users looking to implement this solution, timestamps guide the viewer through the tutorial efficiently.

The video details not just the steps in Power Automate but also the necessary preparations regarding SharePoint and Excel. SharePoint acts as a storage point for input data and the finalized documents. An Excel table within SharePoint holds sample data for document creation. Furthermore, instead of SharePoint, users can integrate various other storage solutions like OneDrive, Dropbox, or Google Drive.
To prepare your Excel file, ensure that your data is formatted as a table for the Power Automate connectors to process it effectively. The Excel table in the demonstration includes columns like First Name, Last Name, and Amount—all essential elements for a personalized document.
When moving on to the Word template, it's vital to enable the "Developer" tab to use Dynamic Content Controls. These controls are critical because they hold the place for data that will subsequently be inserted from the Excel file. The video highlights that at the time of filming, the "plain text" control was preferred for compatibility with Power Automate.
Once your Excel file and Word template are ready, they are uploaded to SharePoint. Here, Power Automate can access them and use the data to generate documents. Part of the tutorial's hands-on demonstration includes adding image files to SharePoint for use in the generated documents.

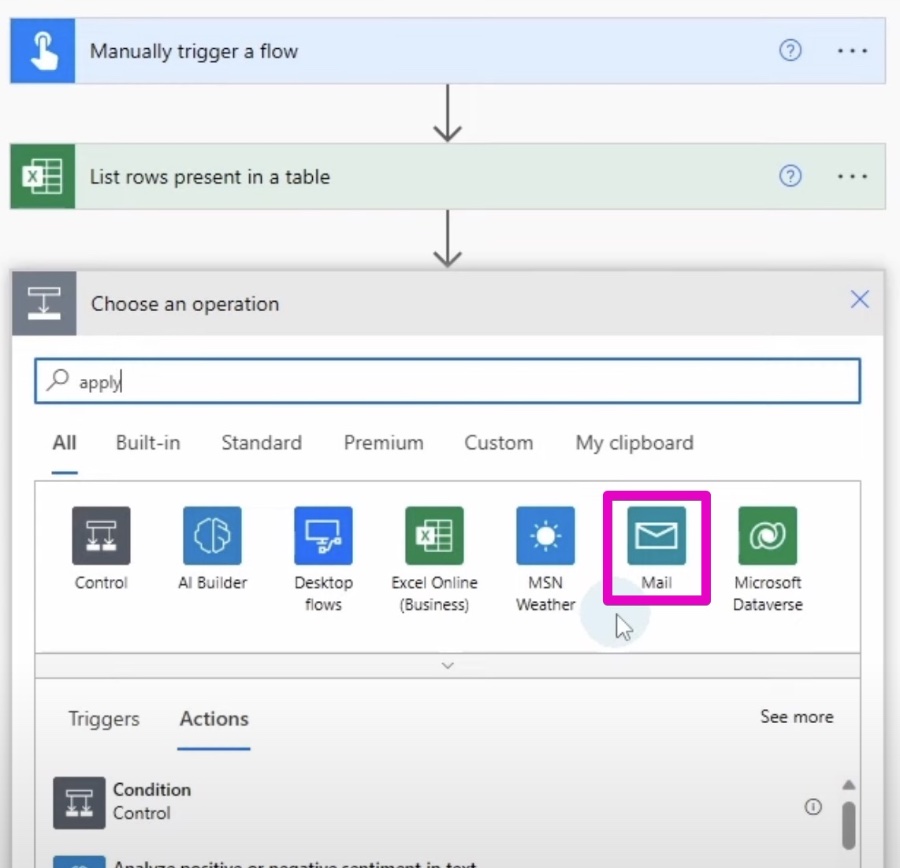
Creating a new automation flow in Power Automate is next. The video outlines each step, starting from a manual instant cloud flow trigger to utilizing Excel and SharePoint connectors. These connectors ensure that the proper files and data are being accessed for the mail merge.
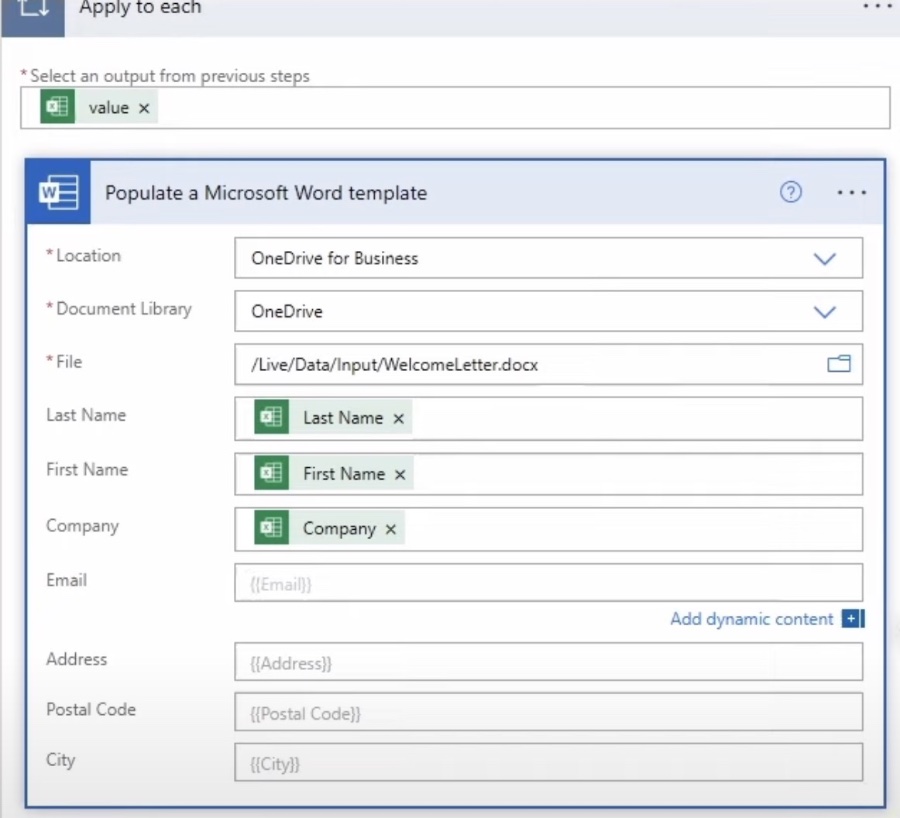
The tutorial continues with adding actions such as 'Apply to each' and 'Get file content,' essential steps for parsing through each row of data and fetching necessary files. The 'Populate a Word Template' connector is then detailed, showcasing how each dynamic content control in the Word document can be matched with corresponding Excel data.
Concluding the flow is the process of saving the automated documents back into SharePoint. Here, the naming convention utilizes the Excel data to personalize each file created. Once run, the flow generates new documents stored in SharePoint, visible and retrievable for business use.
It's essential to consider any licensing costs associated with connectors used in Power Automate. As licensing can be complex, due diligence in understanding these costs is advisable. Also, this example provided in the video serves an educational purpose and can be adapted to different data sources or document types, underlining the versatility of Power Automate.
For those who want more detailed steps on setting up these types of flows, check out this in-depth guide on Power Automate.
Broader Perspectives on Automation
Document automation, such as mail merge using Power Automate, exemplifies how workflow automation can simplify repetitive tasks and allow users to focus on more complex problems. The ability to integrate different Microsoft services such as Excel, Word, and SharePoint into a fluid automation sequence demonstrates the platform's flexibility and potential for scalability within a business setting.

Learn about How to do Mail Merge in Power Automate (Full Tutorial)
With the surge in digital operations, efficient mail automation becomes essential. Mastering skills to handle mailing operations can lead to time-saving and organized work profile. This writes up covers the process to create advanced mail merge in the Microsoft Power Automate application, utilizing Word and its template with placeholders, Excel as a data source, and instant triggering of the flow upon addition of a new file to a folder.
In prior discussions, we have skimmed over Microsoft's Power Platform and its components, like Power Apps and Power Virtual Agents. In today’s session, we explore a detailed use case of generating documents dynamically.
Our solution's various components include SharePoint – utilized as the repository of input data and file storage, Excel File – used as a simple database, and a Word "Template" File – holds a set of Dynamic Content Controls for data binding.
In case your use-case or components don’t align with above given sets, don’t worry. One of the perks of the Power Platform is its flexibility, as it offers connectors to OneDrive, Dropbox, or Google Drive.
First, create an Excel file segmenting data into an actual table. That's important because the connectors we apply will expect the data to be table-formatted.)
Next, create a Word file containing Dynamic Content Controls to data-bind later. You'll need the “Developer” tab enabled to insert Dynamic Content Controls to the document. After customized naming of the control for easy recognition in the automation steps, place your Excel and Word files on SharePoint. Here, the Automate platform of Microsoft accesses them readily.
Flow creation in Power Automate is the most exciting part. Start by creating an automation flow, specifying the trigger as “manual”. Then, navigate to the location control to access your SharePoint instance and point to the Excel file housing your input data. You can now see why a segmented Excel Table was crucial.
Next, search and add an “Apply to each” action, selecting the output from the previous step (values from each Excel table row).
Also, add a SharePoint “Create File” connector with a SharePoint “Get file content” connector and Microsoft Word (Business) flow for a “Populate a Word Template”. At last, save the flow and execute it. Subsequently, navigate to the specified folder in SharePoint, and you should see new documents.
Remember, there might be various licensing costs related with connectors usage, and you must perform a diligent verification of costs. This is just an example prepared for educational purposes only. Indeed, you may want to output it as a PDF instead of a Word file, so you can add another connector at the end of the flow for conversion.
In conclusion, the Power Automate platform offers a flexible and reliable mechanism for handling mail automation operations. Gaining proficiency in this will significantly improve your efficiency and make your workflow easier. Happy learning!
Keywords
Mail Merge Power Automate, Power Automate Full Tutorial, How to Mail Merge, Power Automate Mail Merge Guide, Using Mail Merge in Power Automate, Automate Mail Merge Tutorial, Power Automate Mail Merge Steps, Learn Power Automate Mail Merge, Mail Merge Automation Tips, Mastery of Mail Merge in Power Automate.
